Before beginning installation of the SnapComms Windows app to your desktop, ensure that you meet the Minimum Requirements to run SnapComms smoothly. It is recommended to review the Windows App Profiles before downloading the SnapComms Windows App.
In the following sections, you will learn how to:
DOWNLOAD THE SNAPCOMMS APP
Since version 18.4, the installer for the SnapComms App can be found in the Content Manager by navigating to App Management >> App Download. You can select the version of the Windows app that you want to download by clicking on the drop-down button next to Download, however getting the latest is recommended. Click on the Download button to automatically download the latest version or click on the arrow to get a list of current available Apps.
You may download the client package and use it in a third-party deployment tool (preferred option) or send your users the link to download the software via email. When the users click on the link, they will download the client package from your Content Manager server.
INSTALL THE SNAPCOMMS APP
Once you have downloaded the SnapComms App, installation can be completed directly on the end users' desktop or via a third-party deployment tool. An unattended/silent installation can be performed by:
-
Passing the appropriate command-line switches to the msiexec.exe program (the Windows Installer engine for installing MSI files): msiexec /qn /i snapclient_18.x.xxx.msi or
-
Setting the appropriate option in the application deployment tool to run the installation unattended.
For installation directly on the desktop, open your download folder and double click on the SnapComms App MSI file. Follow the on-screen prompts to complete the installation. You may be prompted by UAC (User Access Control) to confirm installation.
Installing to VDI Environment
SnapComms does not have a license restriction for a user account that is associated with constantly changing machine names due to VDI pool environment. User-based Targeting is recommended for constantly changing machine names. For machine-based targeting to work on a VDI pool environment, please review the following notes:
-
Remove the machine-name from the base image prior to deployment. For customers with VDI environments, where the deployment method will be to create a base image, clone it, and publish IT to VDI machines - please note that the client.registration.machineID entry from HKEY_LOCAL_MACHINE\SOFTWARE\WOW6432Node\SnapComms App\Settings needs to be deleted from the registry on the base image BEFORE deployment. The purpose of removing this item in the registry is so that the SnapComms Windows App recognizes the correct machine ID when it gets deployed to the specific machine / VDI (and does not recognize the machine ID from the base image). If this item in the registry is not deleted, the machine ID (and machine name) for all the users will just be the same.
-
Modify the Machine Info Collection Method from the Windows App Profile. Review your Default Windows App Profile > "User and Machine Information Collection Method" > Machine method settings from the Windows App Management - App Profiles article.
When the installation is complete, you should see the SnapComms icon in your notification tray near your clock. If you do not see it, you may need to click on the up arrow to display all Notification Tray icons.
To launch the Message History window, click on the SnapComms App icon in your Notification Tray.
UPDATE THE SNAPCOMMS APP
Since App version 20.11, you can schedule an App Update from the Content Manager. This feature is available to Content Manager administrators who have been granted permission to the App Updates in their Management Access.
When a new version of the Windows app is available, you will notice a red upgrade icon on the left navigation. The Content Manager administrator can opt into the update by scheduling an App update as shown below.
Click the Schedule an Update button and from the next page, select the target group who will receive the App update. Set the date and time when the update will be pushed and click Publish. The SnapComms Desktop App will be updated at the specified date and time for the target group.
Note: For versions below 20.11, an upgrade of the SnapComms App requires the currently installed version to be uninstalled before the latest version can be installed.
UNINSTALL THE SNAPCOMMS APP
If the SnapComms App was deployed using third party deployment software, uninstalling should be executed using the same software and a restart must be included in this process. For a manual uninstall procedure, there are several methods you can choose, as listed below.
Uninstall Wizard Method
It is recommended you close any running applications before uninstalling. Administrator rights are required to fully remove the software, however if this is not possible, a restart is required after uninstalling the SnapComms client.
If the uninstaller can not close all requested applications due to lack of administrator rights, you may be prompted to manually close the running applications.
-
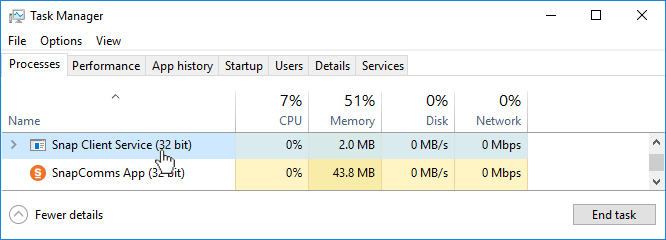
Right-click a blank area on the Task Bar, and choose Task Manager in the context menu.
-
Select Snap Client Service (32 bit). Click End task.
-
Select SnapComms App (32 bit). Click End task.
-
Open Control Panel. Select Programs and Features.
-
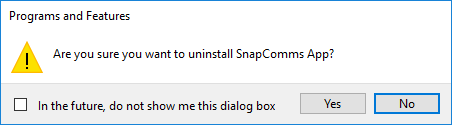
Double click on SnapComms Client. Confirm you wish to uninstall the SnapComms Client by clicking Yes.

-
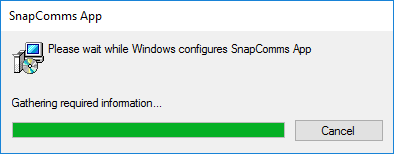
Windows will complete the uninstall process.
Command Line Method
If the original MSI file that was used to install the SnapComms Client is available, run the MsiExec.exe command (Microsoft Windows Installer exec), specifying the /x (or /uninstall) switch and the full path to the MSI file. Windows Installer command-line options are not case-sensitive. Other switches that may be passed to the msiexec.exe command can be found by executing msiexec.exe /?
For example:
msiexec /x c:\folder-where-the-msi-is-located\snapclient.msi /qb-
VBS Script Method
If the original MSI file that was used to install the SnapComms App is not available, the app can still be uninstalled using a VBScript (.vbs script file).
-
Create a new file, for example Uninstall_SnapComms_App.vbs, and paste in the following script code:
Option Explicit

Const msiInstallStateAbsent = 2
Const msiInstallStateDefault = 5

Dim oInstaller, lProducts, i
Set oInstaller = CreateObject("WindowsInstaller.Installer")

' Find installed products
Set lProducts = oInstaller.RelatedProducts("{9F0FAB68-E8CA-11DD-BD28-0016D4EF12CC}")

' Uninstall each installed product
For i = 0 to lProducts.Count - 1
oInstaller.ConfigureProduct lProducts(i), msiInstallStateDefault, msiInstallStateAbsent
Next
-
Execute this script using the Windows Script host (wscript.exe or cscript.exe), specifying the full path to the .vbs script file that has been created.
For example:
wscript.exe C:\[VBS PATH]\Uninstall_SnapComms_App.vbs
Clean up
On systems with roaming profiles the uninstall is not always able to fully clean up all the data and registry keys for all users. This can cause problems with cached data and settings which may result in inconsistent behaviors or app crashes. It is thus especially important to clean up all traces of a previous installation before installing a new one. Below are the list of registry entries and folders that need to be removed.
Remove Registry Entries
-
32 bit machines:
HKEY_LOCAL_MACHINE\SOFTWARE\SnapComms App
HKEY_CURRENT_USER\SOFTWARE\SnapComms App -
64 bit machines
HKEY_LOCAL_MACHINE\SOFTWARE\Wow6432Node\SnapComms App
HKEY_CURRENT_USER\SOFTWARE\SnapComms App
Remove Folders
-
User Folders
C:\Users\%UserName%\AppData\Local\SnapComms App
C:\Users\%UserName%\AppData\Local\SnapComms -
Application Folders
32 bit machines
C:\Program Files\SnapComms\App
64 bit machines:
C:\Program Files (x86)\SnapComms\App -
User Log Folders
C:\Users\%UserName%\AppData\Local\Temp\SnapClient\%UserName%\Logs -
Remove Temporary Files
C:\Users\%UserName%\AppData\Local\Temp\SnapClient
Comments
0 commentsArticle is closed for comments.